TABLE OF CONTENTS
Starting point:
Go to https://ad-optimizer.metoda.com/

For the creation of Sponsored Products, click "Campaigns". This leads you to the campaigns section.
You can either:
Case 1: add SP campaigns for new products manually by clicking “New campaign” or

Case 2: import several new ASINs at once using “Import” and our onboarding template (the Excel-template can be downloaded by clicking "Import", "Download example Excel")

Required input and description:
In both cases, you need to fill in all mandatory information explained in the table below:
| Information | Mandatory/Optional | Description |
| Portfolio | Mandatory | The portfolio the campaign should be running in. |
| Campaign Name | Optional | The campaign name is generated automatically via Ad Optimizer, but can be overwritten with your preferred input (upon creation or afterwards). |
| ASIN | Mandatory for vendors only | The product you want to display in the campaign. You can also use mutiple ASINs per campaign. |
| ASIN - SKU | Mandatory for Sellers only | Use the '@' symbol to assign one or more SKUs to an ASIN e.g. ASIN1@SKU-A@SKU-B. Multi-ASIN campagins: Separate expressions for different ASINs by semicolon. |
| TACOS | Mandatory | The Target ACOS you want to define for your campaign |
| Start | Mandatory | The day on which your campaign is supposed to start |
| End | Optional | Usually left empty (always-on approach), but can be filled with the last day your campaign is supposed to be live. |
| Metoda campaign category | Optional | The category will show in Ad Optimizer Reports and Campaigns section for easy filtering on a group of campaigns |
| Metoda campagin tags | Optional | The tag will show in Ad Optimizer Reports and Campaigns section for easy filtering on a group of campaigns. Mutiple tags per campaign are possible. |
| Targeting Type | Mandatory | Depending on the campaign type, multiple targeting types exist. For SPs, you can choose from: - Amazon auto: for automatic targeting by Amazon - Keyword: for keyword targeting - Product: for product targeting, specific ASINs are required - Category: for targeting based on a whole Amazon category. |
| Target Harvesting | Optional | If not defined, metoda target harvesting, meaning Ad Optimizer searching for suitable targest (e.g. keywords or products) is enabled. If you want to deactivate this process and define keywords exclusively yourself, disable target harvesting. |
| Custom Target settings (negative) | Optional | You can choose from several options: - negative phrase keywords: excludes all search terms that include the keyword indicated. - negative exact keywords: excludes that specific keyword - negative products: excludes the list of ASINs from the targeting - negative brands: excludes the products from a specific brand from the targeting. |
| Custom Target settings (positive) | Optional | You can choose from several options: - Positive broad keywords: the consumer search must broadly match your keyword, including the terms, but not necessarily in the defined order. - Positive phrase keywords: the consumer search must include your specific keyword in the order you have defined. - Positive exact keywords: the consumer needs to search for exactly what you have defined as a keyword. - Positive products: list of ASINs you want to target on their PDPs. |
Case 1: Generation of new campaigns using "New campaign"
There are 4 major steps you need to complete one by one to set up your campaign.
Step 1: Campaign selection
Select the campaign type Sponsored Products

Step 2: Campaign settings

Define the start date (and end date optionally)
Select the right portfolio (use the drop-down list to select an existing portfolio or create a new portfolio via "+ New portfolio")
Set a TACOS
optional - Choose a metoda campaign category (the existing categories are displayed in the selection list after entering. Select one of them or create a new category)
optional - Choose one or several metoda campaign tags
Step 3: Items to advertise
Enter the ASIN(s) of the product(s) you want to advertise. You can decide between single ASIN campaigns (each ASIN will receive a separate campaign) and multi-ASIN campaigns (all given ASINs will be added in the same campaign).
For sellers: add one or multiple SKUs by combining ASIN@SKU-A@SKU-B.

Step 4: Targeting
It is possible to create several campaigns with different targeting types at the same time. A campaign will be created for each ASIN added to "Items to advertise".
Step 4.1: Amazon Auto
Select Amazon auto as targeting type from the drop-down:
Click on "Customize" to add negative Products or Keywords:

Set ASINs negative, for which the advertised ASIN should not be displayed.
Set negative keywords for which the campaign should not be displayed. Exact or phrase match are possible.
Step 4.2: Keyword (manual)

Best practice: We recommend implementing both an "Amazon auto" and a "Keyword" campaign per ASIN.
Select "+ New targeting type" and add the Keyword targeting type
Click on "Delete" to delete one targeting type. (One targeting type always remains available)

Click on "Customize" to add positive or negative keywords.
"Allow metoda target harvesting" -
Please make sure that you have added manual targets, if you deactivate "metoda target harvesting". Otherwise, the campaign will be "incomplete" and cannot be shown.
Important note: If you disable automatic target harvesting after creation, the targets already added by the system will remain. However, no new targets will be added by our target harvesting logic.

Step 4.3: Product targeting

Click on "Customize" to add target ASINs, whenever necessary from a strategic point of view:

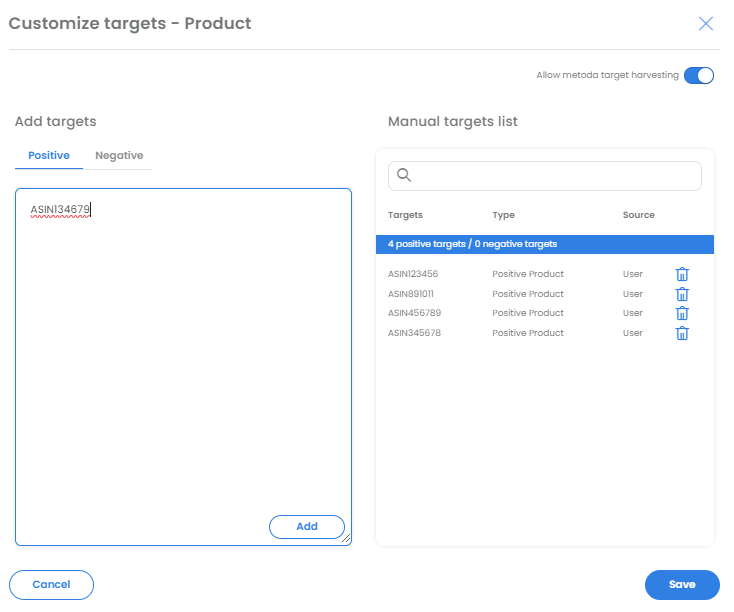
Basically, in terms of targeting strategy, we differentiate between the following tactics:
Defend strategy: use product targeting and defend your own ASINs with your own ASINs (e.g. for cross-selling or up-selling purposes). With this tactic, we try to protect your own product detail pages from competitors.
Narrow attack strategy: use product targeting and attack relevant competitor products (e.g. close substitutes of your products, complementary products). With this tactic, we try to steal traffic from relevant competitor product detail pages.
Broad attack strategy: use category targeting in order to attack all other products in the same category. This is a very broad approach but does not require as much research from your side.

It is possible to set up the same targeting type multiple times. In the case of product targeting, this could be useful for defend and attack campaigns, for example.
Step 4.4: Category targeting
Select "Category" in the drop-down

For category targeting, Ad Optimizer automatically uses Amazon's suggested categories.
Click on "Customize" to add negative targets
It is possible to set brands negatively. To do this, enter the brand name and select it from the drop-down list. It is also possible to set products negative. To do this, enter the ASINs.

Negative targets added

When everything is filled in, click create to create the campaign(s).

It is always possible to go back to the individual steps and change something there.

If everything has worked, the following message will appear. Then refresh the page to see the created campaigns in AdOptimizer.

If something didn't work, you can download an Excel with the error report.
IMPORTANT NOTE: setting a budget period is the necessary requirement for your campaigns to be displayed. Only if a budget period for the selected portfolio exists, your campaigns will be running.
Set a budget: make sure to set a budget in Ad Optimizer (ideally within separated/dedicated portfolios, e.g. "m_sp" & “m_sp_pat”). The Ad Optimizer will take over the budget management. Setting a budget period in the respective portfolio is the necessary requirement for your campaigns to be delivering. Otherwise, the campaign does not have any budget to be spent and will be paused accordingly.
Case 2: Generation of new campaigns using "Import"
Step 1: Download the example Excel and fill in all mandatory information.

Open the "SP" spreadsheet.

The Excel template includes detailed instructions on how to fill in the cells.
Step 2: Fill in the Excel file.
Campaign name: The automatically generated campaign name has the following structure: m_sp_ASIN_targeting-type
Best Practice: we recommend implementing both an "amazon auto" and a "keyword" campaign per ASIN. Two rows must be created for each ASIN.
Tip: Finish your input for "keyword" campaigns first, copy the entire block of campaigns, paste it below the keyword campaigns and adjust only the column "Targeting type" (from "keyword" to "amazon auto").
Step 3: Save the Excel and drag it into the "Import campaigns" screen.

Choose the "Campaigns" upload as well as the matching import settings.
If the bulk template contains numerous targets/keywords, consider selecting "Remove invalid targets/keywords and only add valid ones." However, for a more cautious approach, opt for "Refuse creation/update and provide issue report" to ensure any potential issues with the campaigns are identified and not overlooked or left uncreated.
Download error report if import fails
In case something is not filled in properly, you will receive error messages in a Excel report, indicating in which row adjustments are necessary (Column U). This will only happen, if you choose the import setting "Refuse creation/update and provide issue report".
Common mistakes: e.g. not all mandatory fields were filled, start date in the past, wrong formatting of the cells. Please read the instructions in the template carefully and follow the guidelines. Do not add or delete any columns or change the order of the columns!